
複数ページの Lighthouse の結果を取得したい
これまで、
- LOLIPOP! レンタルサーバーの LiteSpeed サーバー
- WordPress & Cocoon & LiteSpeed cache プラグイン
- QUIC.cloud CDN
を使用して、PageSpeed Insights のパフォーマンスの数値を向上させてきました。この先、QUIC.cloud の使用する CDN リージョンを変更した効果を確認しようと考えています。
PageSpeed Insights の結果を効率よく収集・分析する為に、複数のページの PageSpeed Insights の結果を一括で取得する方法について記事にしました。

Google の提供しているウェブサイトパフォーマンスを測定する方法として、
- PageSpeed Insights (Google のサーバーで実行される Lighthouse)
- Lighthouse (ローカルの Chrome / Chronium で実行される)
の二種類があります。Lighthouse の測定結果が収集されて、PageSpeed Insights の「実際のユーザーの環境で評価する」の項目に反映されているのだと思います。
PageSpeed Insights は Google のサーバー <-> CDN or LOLIPOP! のサーバー間で測定しているので、サイト自体のパフォーマンスを純粋に測定できると思います。とはいえ、実際の環境では PC の能力や通信回線・経路の影響を受けますので、理想的な測定の PageSpeed Insights とは体感が異なる可能性もあります。その点、Chrome / Chronium で測定する Lighthouse は実環境での数値となりますので、あくまで私の環境ではありますが現実に即した結果になると思います。
そこで、複数のページの Lighthouse の結果をコマンドラインで一括して取得する方法について調べてみました。
Lighthouse の結果を単独ページで取得する
先ずは、単独ページで Lighthouse の結果を取得する方法について調べました。Chrome 拡張機能の Lighthouse は PageSpeed Insights と同等でしたので除外します。
Chrome デベロッパーツール版 Lighthouse
Chrome には、元々 Lighthouse の機能が含まれています。通常の画面では表示されませんが、デベロッパーツールに Lighthouse の項目があります。
Chrome 右上の3点縦リーダーからデベロッパーツール選択すると表示されます。F12 キーでも表示されます。

デベロッパーツールのメニューに "Lighthouse" の項目がありますので、選択します。
モードはデフォルトのままナビゲーションを選択、デバイスは希望するものを選択し、カテゴリは必要ならパフォーマンス以外にもチェックを入れます。その後「ページ読み込みを分析」を押して少し待つと結果が表示されます。
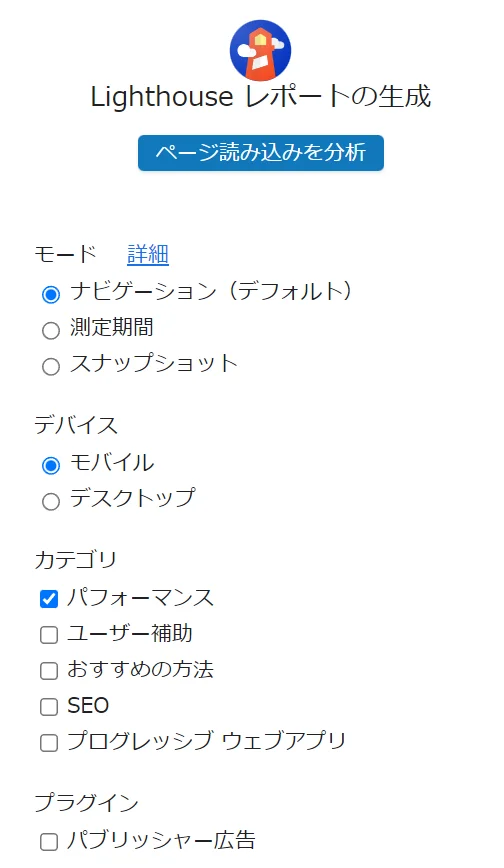
もし下の方に次のメッセージが表示されていた場合には、シークレットウィンドウを使って測定した方が良いと思います。(そのまま実行すると低い値が表示されます)

コマンドライン版 Lighthouse
Chrome デベロッパーツールに含まれる Lighthouse を呼び出す場合には、マウス操作が必要となり複数ページを連続して測定する事は出来ませんし、測定結果を数値で得る事も出来ません。
そこで、コマンドライン版の Lighthouse を探した所、以下の github のページにありました。

こちらを使用してみます。Windows11 側で実行する場合と、WSL2 Ubuntu 22.04 LTS で実行する場合の二種類で試してみました。
Windows11 で実行する場合
Windows11 でコマンドライン版の lighthouse を使用する為には、Chrome と Node.js が必要です。Chrome はインストール済みなので、Node.js をインストールします。
こちらを参考に作業しました。


以下、PowerShell で実行します。
NVM for Windows をインストール
winget で直接 Node.js をインストールする事も出来ますが、使用する Node.js を切り替えられた方が便利なので、先に NVM for Windows をインストールします。
> winget search "NVM for Windows"
名前            ID                        バージョン ソース
------------------------------------------------------------
NVM for Windows CoreyButler.NVMforWindows 1.1.10     winget

> winget install "NVM for Windows"
# ターミナルを再起動して PATH を反映
> nvm --version
1.1.10
Node.js をインストール
コマンドライン版の lighthouse は Node 16 LTS 以上で動作します。今回は Node.js 18 LTS で試します。
Lighthouse requires Node 16 LTS (16.x) or later.
https://github.com/GoogleChrome/lighthouse
nvm を使用して Windows11 に Node.js をインストールします。
> nvm list available

|   CURRENT    |     LTS      |  OLD STABLE  | OLD UNSTABLE |
|--------------|--------------|--------------|--------------|
|    19.8.1    |   18.15.0    |   0.12.18    |   0.11.16    |
|    19.8.0    |   18.14.2    |   0.12.17    |   0.11.15    |
|    19.7.0    |   18.14.1    |   0.12.16    |   0.11.14    |
|    19.6.1    |   18.14.0    |   0.12.15    |   0.11.13    |
|    19.6.0    |   18.13.0    |   0.12.14    |   0.11.12    |
|    19.5.0    |   18.12.1    |   0.12.13    |   0.11.11    |
|    19.4.0    |   18.12.0    |   0.12.12    |   0.11.10    |
|    19.3.0    |   16.19.1    |   0.12.11    |    0.11.9    |
|    19.2.0    |   16.19.0    |   0.12.10    |    0.11.8    |
|    19.1.0    |   16.18.1    |    0.12.9    |    0.11.7    |
|    19.0.1    |   16.18.0    |    0.12.8    |    0.11.6    |
|    19.0.0    |   16.17.1    |    0.12.7    |    0.11.5    |
|   18.11.0    |   16.17.0    |    0.12.6    |    0.11.4    |
|   18.10.0    |   16.16.0    |    0.12.5    |    0.11.3    |
|    18.9.1    |   16.15.1    |    0.12.4    |    0.11.2    |
|    18.9.0    |   16.15.0    |    0.12.3    |    0.11.1    |
|    18.8.0    |   16.14.2    |    0.12.2    |    0.11.0    |
|    18.7.0    |   16.14.1    |    0.12.1    |    0.9.12    |
|    18.6.0    |   16.14.0    |    0.12.0    |    0.9.11    |
|    18.5.0    |   16.13.2    |   0.10.48    |    0.9.10    |

This is a partial list. For a complete list, visit https://nodejs.org/en/download/releases

> nvm install 18.15.0
Downloading node.js version 18.15.0 (64-bit)...
Extracting node and npm...
Complete
npm v9.5.0 installed successfully.

Installation complete. If you want to use this version, type

nvm use 18.15.0

> nvm use 18.15.0
Now using node v18.15.0 (64-bit)

> node --version
v18.15.0
> npm --version
9.5.0

# インストールされた場所
> where.exe nvm
C:\Users\hiro\AppData\Roaming\nvm\nvm.exe
> where.exe node
C:\Program Files\nodejs\node.exe
> where.exe npm
C:\Program Files\nodejs\npm
C:\Program Files\nodejs\npm.cmd
nvm.exe はユーザーのホームディレクトリ以下に、node.exe と npm.exe は Program Files\nodejs に、それぞれ配置されます。
コマンドライン版 lighthouse のインストール
npm コマンドで lighthouse をインストールします。lh_test フォルダを作成して、その中にインストールします。lh_test\node_modules 以下にインストールされますので、実行ファイルの場所を確認します。
> npm search lighthouse | Select-string -Pattern '^lighthouse '
lighthouse                | Automated auditing,… | =paulirish…     | 2023-03-01 | 10.0.2   | google chrome devtools

> mkdir lh_test
> cd lh_test
# 初期化
> npm init -y
# インストール
> npm install lighthouse

> ls .\node_modules\.bin\lighthouse*

    Directory: C:\Users\hiro\lh_test\node_modules\.bin

Mode                 LastWriteTime         Length Name
----                 -------------         ------ ----
-a---          2023/03/21    11:41            314 lighthouse
-a---          2023/03/21    11:41            328 lighthouse.cmd
-a---          2023/03/21    11:41            817 lighthouse.ps1
コマンドライン版 lighthouse を実行する
lighthouse コマンドは作成したディレクトリの node_modules\.bin 以下にインストールされます。PATH は通していないので直接実行します。
> .\node_modules\.bin\lighthouse https://hiro20180901.com `
 --only-categories="performance" --form-factor="mobile" `
--quiet --chrome-flags="--headless" --locale="ja"
コマンドライン版の lighthouse のオプションは以下のページに記載されています。
今回使用したのは以下のオプションです。
- --only-categories="performance" : パフォーマンスのみ計測
- --form-factor="mobile" : モバイルで計測
- --preset="desktop" : デスクトップで計測
- --quiet --chrome-flags="--headless" : 情報を表示せず、chrome の画面も表示しない
- --locale="ja" : 結果を日本語表示
html ファイルが作成されますので、Chrome で開いて Lighthouse の結果が表示されれば正常に動作しています。少しのズレはありますが、Chrome デベロッパーツール版 Lighthouse で測定した結果と概ね同じ結果が得られます。
コマンドライン版 lighthouse の結果を WSL2 側で受け取る
WSL2 側から Windows11 にインストールしたコマンドライン版 lighthouse を実行する場合には、cmd.exe で lighthouse.cmd を実行します(PowerShell では上手く実行できませんでした)。そのままではカレントフォルダが C:\Windows になり書き込み不可となりますので、--output="json" を付加して標準出力に JSON 形式で表示するようにして、リダイレクトで results.json に保存するようにしました。
$ cmd.exe /mnt/c/users/hiro/lh_test/node_modules/.bin/lighthouse.cmd \
 https://hiro20180901.com --only-categories="performance" \
 --form-factor="mobile" --quiet --chrome-flags="--headless" \
 --locale="ja" --output="json" > results.json
この JSON 形式のファイルは Lighthouse Report Viewer にドラッグ & ドロップする事により、いつものウェブ画面の結果と同様に表示できます。

Windows11 コマンドライン版 lighthouse まとめ
手順を箇条書きで記載します。
- NVM for Windows のインストール ... Node.js のバージョン管理用
- Node.js のインストール
- コマンドライン版 lighthouse をインストール
- 新規にフォルダを作成
- npm init & npm install lighthouse
- Windows11 上で動作確認 ... html を作成、ウェブブラウザで確認
- WSL2 から cmd.exe で実行 ... JSON 形式で結果を保存
ここまでで、Windows11 のコマンドライン版 lighthouse を使用して、WSL2 で JSON 形式の結果が受け取られるようになりました。
WSL2 Ubuntu 22.04 LTS で実行する場合
Windows11 との比較の為に、WSL2 Ubuntu 22.04 LTS でもコマンドライン版の lighthouse が使用できるように設定します。
WSL2 Ubuntu 22.04 LTS へ chrome をインストール
WSL2 Ubuntu 22.04 LTS に Chrome をインストールします。Windows11 側の Chrome を使っての測定は出来ませんでした。(Windows11 側で Chrome が起動しますが測定データの受け取りができない)
$ pwd
/home/hiro
$ wget https://dl.google.com/linux/direct/google-chrome-stable_current_amd64.deb
$ ls -l *deb
-rw-r--r-- 1 hiro hiro 93937560 Mar  4 18:06 google-chrome-stable_current_amd64.deb
$ sudo apt install ./google-chrome-stable_current_amd64.deb
google のサイトから chrome の deb ファイルをダウンロードして、apt でインストールします。通常、deb ファイルは dpkg コマンドでインストールするのですが、依存関係を解決しつつインストールする必要があるので、apt を使用します。
インストール後は、apt line も追加されるので、apt コマンドで随時アップデートされます。
WSL2 Ubuntu 22.04 LTS で chrome を起動するコマンドは google-chrome です。WSLg も使えるようになっていれば、Windows11 側に chrome の画面が表示されます。
nvm をインストール
Windows11 側と同様に、Node.js のバージョン管理が便利になるように nvm をインストールします。次のページを参考に実施しました。

nvm の最新版は Ver.0.39.3 になっていましたので、github を参考に以下の様にインストールしました。
%22%20transform%3D%22translate(.5%20.5)%22%20fill-opacity%3D%22.5%22%3E%3Cellipse%20fill%3D%22%23889449%22%20rx%3D%221%22%20ry%3D%221%22%20transform%3D%22matrix(-.02157%2015.29388%20-36.02992%20-.05081%2075.9%2039.1)%22%2F%3E%3Cellipse%20cx%3D%2280%22%20cy%3D%2274%22%20rx%3D%22159%22%20ry%3D%2219%22%2F%3E%3Cellipse%20cx%3D%2291%22%20cy%3D%2210%22%20rx%3D%22159%22%20ry%3D%2214%22%2F%3E%3Cellipse%20fill%3D%22%232d2c35%22%20rx%3D%221%22%20ry%3D%221%22%20transform%3D%22matrix(55.2347%20-3.66446%201.09766%2016.54515%20141.5%2040.3)%22%2F%3E%3C%2Fg%3E%3C%2Fsvg%3E)
curl -o- https://raw.githubusercontent.com/nvm-sh/nvm/v0.39.3/install.sh | bash
# WSL2 ターミナル再起動
$ nvm --version
0.39.3
名前と機能は似ていますが NVM for Windows とは別のソフトウェアですので、オプションや使い方は異なります。
nvm コマンドは bash の complete という機能を利用して実現していますので、which では見つかりません。実体は ~/.nvm 以下の nvm.sh と bash_completion で定義されています。
Node.js のインストール
WSL2 Ubuntu 22.04 LTS では Node.js のバージョンが古い (v12.22.9) のでアップデートします。Ubuntu 標準の Node.js がインストールされていた場合には、purge してから実行します。
$ nvm ls-remote | grep 'Latest LTS'
         v4.9.1   (Latest LTS: Argon)
        v6.17.1   (Latest LTS: Boron)
        v8.17.0   (Latest LTS: Carbon)
       v10.24.1   (Latest LTS: Dubnium)
      v12.22.12   (Latest LTS: Erbium)
       v14.21.3   (Latest LTS: Fermium)
       v16.19.1   (Latest LTS: Gallium)
       v18.15.0   (Latest LTS: Hydrogen)
$ nvm install 18.15.0
Downloading and installing node v18.15.0...
Downloading https://nodejs.org/dist/v18.15.0/node-v18.15.0-linux-x64.tar.xz...
######################################################################################################### 100.0%
Computing checksum with sha256sum
Checksums matched!
Now using node v18.15.0 (npm v9.5.0)
Creating default alias: default -> 18.15.0 (-> v18.15.0)

$ node --version
v18.15.0
$ npm --version
9.5.0

$ which node
/home/hiro/.nvm/versions/node/v18.15.0/bin/node
$ which npm
/home/hiro/.nvm/versions/node/v18.15.0/bin/npm
node も npm も、~/.nvm 以下にインストールされます。
コマンドライン版 lighthouse のインストール
コマンドライン版の lighthouse を npm でインストールします。Windows11 の時と同様の方法です。
$ mkdir lh_test_linux_side
$ cd lh_test_linux_side
$ npm init -y
$ npm install lighthouse
npm WARN deprecated [email protected]: We've written a new parser that's 6x faster and is backwards compatible. Please use @formatjs/icu-messageformat-parser
(...snip...)
npm notice New minor version of npm available! 9.5.0 -> 9.6.2
npm notice Changelog: https://github.com/npm/cli/releases/tag/v9.6.2
npm notice Run npm install -g [email protected] to update!

$ ls node_modules/.bin/*lighthouse*
node_modules/.bin/lighthouse
Warning と Notice は出ていますが、そのまま使用できます。Windows11 の時と同様に PATH は通っていないので、直接指定して実行します。
コマンドライン版の lighthouse を実行する
準備が整いましたので、コマンドライン版の lighthouse を実行します。chrome は WSL2 にインストールした物を CHROME_PATH に指定して使います。
前述したように、CHROME_PATH を指定しないで lighthouse を実行すると、Windows11 側の Chrome が起動しますが、WSL2 側の lighthouse と Windows11 側の Chrome で情報がやり取りできないようで、エラーが発生します。
# mobile の場合
$ CHROME_PATH="/usr/bin/google-chrome" node_modules/.bin/lighthouse \
 https://hiro20180901.com --only-categories="performance" \
 --form-factor="mobile" --quiet --chrome-flags="--headless" --locale="ja"
# desktop の場合
$ CHROME_PATH="/usr/bin/google-chrome" node_modules/.bin/lighthouse \
 https://hiro20180901.com --only-categories="performance" \
 --preset="desktop" --quiet --chrome-flags="--headless" --locale="ja"
結果は html で保存されていますので、ウェブブラウザで開くと結果が確認できます。
--output="json" を付加すれば標準出力に JSON 形式で表示しますので、リダイレクトでファイルに保存します。
# mobile の場合
$ CHROME_PATH="/usr/bin/google-chrome" node_modules/.bin/lighthouse \
 https://hiro20180901.com --only-categories="performance" \
 --form-factor="mobile" --quiet --chrome-flags="--headless" --locale="ja" \
 --output="json" > results_mobile.json
# desktop の場合
$ CHROME_PATH="/usr/bin/google-chrome" node_modules/.bin/lighthouse \
 https://hiro20180901.com --only-categories="performance" \
 --preset="desktop" --quiet --chrome-flags="--headless" --locale="ja" \
 --output="json" > results_desktop.json
原因の追究は出来ていませんが、作業用ディレクトリが作成されて測定終了後も消去されずに残ってしまいます。とりあえず、測定後に消去する事で対処します。
WSL2 Ubuntu 22.04 LTS コマンドライン版 lighthouse まとめ
手順を箇条書きで記載します。
- WSL2 Ubuntu へ Chrome をインストール
- nvm のインストール ... Node.js のバージョン管理用
- Node.js のインストール
- コマンドライン版 lighthouse をインストール
- 新規にフォルダを作成
- npm init & npm install lighthouse
- 動作確認 ... html を作成、ウェブブラウザで確認
- JSON 形式で結果を保存
ここまでで、WSL2 のコマンドライン版 lighthouse を使用して JSON 形式の結果を記録する事ができました。
保存される JSON 形式のファイルの情報
Mobile の結果について、コマンドライン版 lighthouse で記録される JSON 形式のファイルの主要な項目を抜き出したものを示します。適宜省略 & 順番を入れ替えています。
{
  "lighthouseVersion": "10.0.2",
  "requestedUrl": "https://hiro20180901.com/",
  "audits": {
    "first-contentful-paint": {
      "title": "First Contentful Paint",
      "numericValue": 1333.2269999999999,
      "numericUnit": "millisecond",
      "displayValue": "1.3 秒"
    },
    "total-blocking-time": {
      "title": "Total Blocking Time",
      "numericValue": 127,
      "numericUnit": "millisecond",
      "displayValue": "130 ミリ秒"
    },
    "speed-index": {
      "title": "Speed Index",
      "numericValue": 1333.2269999999999,
      "numericUnit": "millisecond",
      "displayValue": "1.3 秒"
    },
    "largest-contentful-paint": {
      "title": "Largest Contentful Paint",
      "numericValue": 2746.045361022949,
      "numericUnit": "millisecond",
      "displayValue": "2.7 秒"
    },
    "cumulative-layout-shift": {
      "title": "Cumulative Layout Shift",
      "numericValue": 0,
      "numericUnit": "unitless",
      "displayValue": "0",
    },
  },
  "categories": {
    "performance": {
      "title": "パフォーマンス",
      "score": 0.95
    }
  },
}
PageSpeed Insights から得られる JSON との違いは、トップレベルに "lighthouseResult" が無く、"audits" と "categories" がトップレベルから直接存在している事です。それ以外の各項目の中身に違いはありませんでした。
前回修正した psi-score-collector (Pyhton スクリプト) の改変版が流用できそうです。
Lighthouse の結果を集計する lh-score-collector
psi-score-collector では指定した URL を読み込んで JSON 形式で受け取り、必要な項目を抜き出して集計していました。URL を読み込む代わりに Node.js の lighthouse コマンドを実行すれば、似たような形式の JSON 形式の結果が得られますので、少しの改変で実現できそうです。
という事で、lh-sccore-collector という名称で Python スクリプトを作成しました。
こちらのページを参考に subprocess モジュールを使用しました。

psi-score-collector の時には Poetry という Python のパッケージマネージャーと Requests モジュールを使用していましたが、今回は使用しません。
事前に Python の仮想環境を作成し、numpy をインストールします。
$ mkdir lh-score-collector
$ cd lh-score-collector
$ python3 -m venv .env
$ source .env/bin/activate
$ pip install numpy
標準モジュールの subprocess でコマンドライン版の lighthouse を実行し、JSON 形式のデータを扱う為に json モジュールを、環境変数の追加の為に os モジュールを使用します。
target を WSL2 か Windows11 を選択する事により、その環境でコマンドライン版 lighthouse の結果を取得します。集計や表示部分は psi-score-collector からの流用です。
$ cat main.py
import subprocess
import json
import os
import math
import numpy
from decimal import Decimal, ROUND_HALF_UP

# 環境変数をコピーして LANG=C に設定
env = dict(os.environ)
env['LANG'] = 'C'

# Windows11 で測定するか WSL2 で測定するか選択
#target = 'WSL2'
target = 'Windows11'

# 環境に合わせて修正する
windows_lh_path = '/mnt/c/Users/hiro/lh_test/node_modules/.bin/lighthouse.cmd'
wsl2_lh_path = '/home/hiro/lh_test_linux_side/node_modules/.bin/lighthouse'
wsl2_chrome_path = '/usr/bin/google-chrome'

# 測定回数
measurement_count = 3;

# 測定対象 URL
url_list = [
  'https://hiro20180901.com/',
  'https://hiro20180901.com/2023/01/30/use-litespeed-cache-on-wordpress/',
  'https://hiro20180901.com/2023/02/25/use-quic-cloud-cdn-wordpress-lite-speed-cache-plugin/',
  'https://hiro20180901.com/2023/03/02/wordpress-litespeed-cache-plugin-optimization/',
  'https://hiro20180901.com/2023/03/04/wordpress-litespeed-cache-plugin-image-optimization/',
  'https://hiro20180901.com/2023/03/08/wordpress-litespeed-cache-optimization-guest-mode-etc/'
]

def calculate_average(scores):
  score_average_raw = numpy.average(scores)
  average_scores = {}
  average_scores['main'] = Decimal(str(score_average_raw)).quantize(Decimal('0.001'), rounding=ROUND_HALF_UP)
  average_scores['max'] = numpy.amax(scores)
  average_scores['min'] = numpy.amin(scores)

  return average_scores

def measure(device):
  device_name = {
    'mobile': 'Mobile',
    'desktop': 'Desktop'
  }

  print(f'[ {device_name[device]} ]')

  # lighthouse を実行するコマンドを構成する
  cmd=[]
  if target == 'Windows11':
      cmd.append('cmd.exe')
      cmd.append(windows_lh_path)
  else:  # WSL2
      cmd.append(wsl2_lh_path)
      env['CHROME_PATH'] = wsl2_chrome_path

  cmd.append(url)

  if device == 'mobile':
      cmd.append('--form-factor="mobile"')
  else:
      cmd.append('--preset="desktop"')

  # common
  cmd.append('--only-categories="performance"')  # performance only
  cmd.append('--quiet')  # quiet
  cmd.append('--chrome-flags="--headless"')  # headless measuring
  cmd.append('--disable-full-page-screenshot')  # do not use screenshot
  cmd.append('--output="json"')  # JSON

  scores = []
  lab_fcp_scores = []
  lab_tbt_scores = []
  lab_si_scores = []
  lab_lcp_scores = []
  lab_cls_scores = []

  for i in range(measurement_count):
    result = subprocess.run(cmd, check=True, capture_output=True, env=env)
    result_json = json.loads(result.stdout)
    result_score = result_json['categories']['performance']['score']
    displayed_score = math.floor(result_score * 100)

    lab_data_scores = {}
    lab_data_scores['fcp'] = result_json['audits']['first-contentful-paint']['numericValue'] / 1000
    lab_data_scores['tbt'] = result_json['audits']['total-blocking-time']['numericValue'] / 1000
    lab_data_scores['si'] = result_json['audits']['speed-index']['numericValue'] / 1000
    lab_data_scores['lcp'] = result_json['audits']['largest-contentful-paint']['numericValue'] /1000
    lab_data_scores['cls'] = result_json['audits']['cumulative-layout-shift']['numericValue'] / 1000

    lab_fcp_scores.append(lab_data_scores['fcp'])
    lab_tbt_scores.append(lab_data_scores['tbt'])
    lab_si_scores.append(lab_data_scores['si'])
    lab_lcp_scores.append(lab_data_scores['lcp'])
    lab_cls_scores.append(lab_data_scores['cls'])
    scores.append(displayed_score)
    print(displayed_score, end=' ')

  average_scores = calculate_average(scores)
  average_lab_fcp_scores = calculate_average(lab_fcp_scores)
  average_lab_tbt_scores = calculate_average(lab_tbt_scores)
  average_lab_si_scores = calculate_average(lab_si_scores)
  average_lab_lcp_scores = calculate_average(lab_lcp_scores)
  average_lab_cls_scores = calculate_average(lab_cls_scores)
  print('\nAvg. {main} (min {min} max {max} )' \
    .format(
      main=average_scores['main'],
      min=average_scores['min'],
      max=average_scores['max']
    ))
  print('(Labo Data)', end=' ')
  print('FCP: {main} s'.format(main=average_lab_fcp_scores['main']), end=', ')
  print('TBT: {main} s'.format(main=average_lab_tbt_scores['main']), end=', ')
  print('SI : {main} s'.format(main=average_lab_si_scores['main']), end=', ')
  print('LCP: {main} s'.format(main=average_lab_lcp_scores['main']), end=', ')
  print('CLS: {main}'.format(main=average_lab_cls_scores['main']))

print('\n '.join(map(str, url_list)))
print(f' measuring...({measurement_count} times)')

for i, url in enumerate(url_list):
  print(f'\n({i + 1}/{len(url_list)}) {url}')

  measure('mobile')
  measure('desktop')

  print('\n' + '=' * 60)

print('\nFinish!!')
結果の出力は psi-score-collector と同じ形式です。
lh-score-collector による計測結果
Windows11 と WSL2 のそれぞれで lh-score-collector で lighthouse の結果を取得しました。
Windows11 版の結果
まずは Windows11 版です。Windows11版の Node.js と lighthouse、chrome を使用しています。結果の取得のみ WSL2 Ubuntu の lh-score-collector で行っています。
$ python3 main.py
 https://hiro20180901.com/
 https://hiro20180901.com/2023/01/30/use-litespeed-cache-on-wordpress/
 https://hiro20180901.com/2023/02/25/use-quic-cloud-cdn-wordpress-lite-speed-cache-plugin/
 https://hiro20180901.com/2023/03/02/wordpress-litespeed-cache-plugin-optimization/
 https://hiro20180901.com/2023/03/04/wordpress-litespeed-cache-plugin-image-optimization/
 https://hiro20180901.com/2023/03/08/wordpress-litespeed-cache-optimization-guest-mode-etc/
 measuring...(3 times)

(1/6) https://hiro20180901.com/
[ Mobile ]
94 96 95
Avg. 95.000 (min 94 max 96 )
(Labo Data) FCP: 1.280 s, TBT: 0.015 s, SI : 1.280 s, LCP: 2.855 s, CLS: 0.000
[ Desktop ]
99 99 99
Avg. 99.000 (min 99 max 99 )
(Labo Data) FCP: 0.568 s, TBT: 0.000 s, SI : 0.568 s, LCP: 0.931 s, CLS: 0.000

============================================================

(2/6) https://hiro20180901.com/2023/01/30/use-litespeed-cache-on-wordpress/
[ Mobile ]
94 95 95
Avg. 94.667 (min 94 max 95 )
(Labo Data) FCP: 1.189 s, TBT: 0.002 s, SI : 1.189 s, LCP: 2.947 s, CLS: 0.000
[ Desktop ]
100 100 100
Avg. 100.000 (min 100 max 100 )
(Labo Data) FCP: 0.436 s, TBT: 0.000 s, SI : 0.436 s, LCP: 0.666 s, CLS: 0.000

============================================================

(3/6) https://hiro20180901.com/2023/02/25/use-quic-cloud-cdn-wordpress-lite-speed-cache-plugin/
[ Mobile ]
94 93 95
Avg. 94.000 (min 93 max 95 )
(Labo Data) FCP: 1.649 s, TBT: 0.000 s, SI : 1.649 s, LCP: 2.993 s, CLS: 0.000
[ Desktop ]
100 100 100
Avg. 100.000 (min 100 max 100 )
(Labo Data) FCP: 0.518 s, TBT: 0.000 s, SI : 0.518 s, LCP: 0.694 s, CLS: 0.000

============================================================

(4/6) https://hiro20180901.com/2023/03/02/wordpress-litespeed-cache-plugin-optimization/
[ Mobile ]
94 94 94
Avg. 94.000 (min 94 max 94 )
(Labo Data) FCP: 1.638 s, TBT: 0.002 s, SI : 1.638 s, LCP: 2.970 s, CLS: 0.000
[ Desktop ]
100 100 100
Avg. 100.000 (min 100 max 100 )
(Labo Data) FCP: 0.396 s, TBT: 0.000 s, SI : 0.396 s, LCP: 0.725 s, CLS: 0.000

============================================================

(5/6) https://hiro20180901.com/2023/03/04/wordpress-litespeed-cache-plugin-image-optimization/
[ Mobile ]
95 95 94
Avg. 94.667 (min 94 max 95 )
(Labo Data) FCP: 1.441 s, TBT: 0.000 s, SI : 1.441 s, LCP: 2.967 s, CLS: 0.000
[ Desktop ]
100 100 100
Avg. 100.000 (min 100 max 100 )
(Labo Data) FCP: 0.402 s, TBT: 0.000 s, SI : 0.402 s, LCP: 0.693 s, CLS: 0.000

============================================================

(6/6) https://hiro20180901.com/2023/03/08/wordpress-litespeed-cache-optimization-guest-mode-etc/
[ Mobile ]
94 95 95
Avg. 94.667 (min 94 max 95 )
(Labo Data) FCP: 1.452 s, TBT: 0.000 s, SI : 1.452 s, LCP: 2.960 s, CLS: 0.000
[ Desktop ]
100 100 100
Avg. 100.000 (min 100 max 100 )
(Labo Data) FCP: 0.461 s, TBT: 0.000 s, SI : 0.461 s, LCP: 0.756 s, CLS: 0.000

============================================================

Finish!!
WSL2 Ubuntu 版の結果
事前に google-chrome を起動しておきます。(起動時のオーバーヘッドを無くすため)
$ google-chrome &
$ ps
    PID TTY          TIME CMD
    525 pts/0    00:00:00 bash
   3277 pts/0    00:00:03 chrome
   3281 pts/0    00:00:00 cat
   3282 pts/0    00:00:00 cat
   3292 pts/0    00:00:00 chrome
   3293 pts/0    00:00:00 chrome
   3294 pts/0    00:00:00 nacl_helper
   3297 pts/0    00:00:00 chrome
   3327 pts/0    00:00:03 chrome
   3328 pts/0    00:00:00 chrome
   3336 pts/0    00:00:00 chrome
   3393 pts/0    00:00:00 chrome
   3395 pts/0    00:00:00 chrome
   3448 pts/0    00:00:00 chrome
   3514 pts/0    00:00:00 chrome
   3552 pts/0    00:00:00 chrome
   3633 pts/0    00:00:00 chrome
   3676 pts/0    00:00:00 chrome
   3754 pts/0    00:00:00 ps
WSL2 Ubuntu 版の結果です。Node.js、コマンドライン版 lighthouse、chrome、lh-score-collector の全てを WSL2 Ubuntu で実行しています。
$ python3 main.py
https://hiro20180901.com/
 https://hiro20180901.com/2023/01/30/use-litespeed-cache-on-wordpress/
 https://hiro20180901.com/2023/02/25/use-quic-cloud-cdn-wordpress-lite-speed-cache-plugin/
 https://hiro20180901.com/2023/03/02/wordpress-litespeed-cache-plugin-optimization/
 https://hiro20180901.com/2023/03/04/wordpress-litespeed-cache-plugin-image-optimization/
 https://hiro20180901.com/2023/03/08/wordpress-litespeed-cache-optimization-guest-mode-etc/
 measuring...(3 times)

(1/6) https://hiro20180901.com/
[ Mobile ]
93 94 94
Avg. 93.667 (min 93 max 94 )
(Labo Data) FCP: 1.259 s, TBT: 0.112 s, SI : 1.259 s, LCP: 2.820 s, CLS: 0.000
[ Desktop ]
99 100 99
Avg. 99.333 (min 99 max 100 )
(Labo Data) FCP: 0.568 s, TBT: 0.000 s, SI : 0.568 s, LCP: 0.805 s, CLS: 0.000

============================================================

(2/6) https://hiro20180901.com/2023/01/30/use-litespeed-cache-on-wordpress/
[ Mobile ]
94 95 94
Avg. 94.333 (min 94 max 95 )
(Labo Data) FCP: 1.805 s, TBT: 0.001 s, SI : 1.805 s, LCP: 2.876 s, CLS: 0.000
[ Desktop ]
99 100 99
Avg. 99.333 (min 99 max 100 )
(Labo Data) FCP: 0.587 s, TBT: 0.008 s, SI : 0.587 s, LCP: 0.838 s, CLS: 0.000

============================================================

(3/6) https://hiro20180901.com/2023/02/25/use-quic-cloud-cdn-wordpress-lite-speed-cache-plugin/
[ Mobile ]
91 93 94
Avg. 92.667 (min 91 max 94 )
(Labo Data) FCP: 2.086 s, TBT: 0.000 s, SI : 2.086 s, LCP: 2.968 s, CLS: 0.000
[ Desktop ]
99 99 99
Avg. 99.000 (min 99 max 99 )
(Labo Data) FCP: 0.767 s, TBT: 0.000 s, SI : 0.767 s, LCP: 0.780 s, CLS: 0.000

============================================================

(4/6) https://hiro20180901.com/2023/03/02/wordpress-litespeed-cache-plugin-optimization/
[ Mobile ]
94 94 93
Avg. 93.667 (min 93 max 94 )
(Labo Data) FCP: 1.745 s, TBT: 0.008 s, SI : 1.745 s, LCP: 2.974 s, CLS: 0.000
[ Desktop ]
99 98 99
Avg. 98.667 (min 98 max 99 )
(Labo Data) FCP: 0.688 s, TBT: 0.000 s, SI : 0.688 s, LCP: 0.844 s, CLS: 0.000

============================================================

(5/6) https://hiro20180901.com/2023/03/04/wordpress-litespeed-cache-plugin-image-optimization/
[ Mobile ]
94 90 94
Avg. 92.667 (min 90 max 94 )
(Labo Data) FCP: 2.162 s, TBT: 0.000 s, SI : 2.162 s, LCP: 2.978 s, CLS: 0.000
[ Desktop ]
99 99 99
Avg. 99.000 (min 99 max 99 )
(Labo Data) FCP: 0.755 s, TBT: 0.000 s, SI : 0.755 s, LCP: 0.755 s, CLS: 0.000

============================================================

(6/6) https://hiro20180901.com/2023/03/08/wordpress-litespeed-cache-optimization-guest-mode-etc/
[ Mobile ]
94 94 94
Avg. 94.000 (min 94 max 94 )
(Labo Data) FCP: 1.829 s, TBT: 0.000 s, SI : 1.829 s, LCP: 2.871 s, CLS: 0.000
[ Desktop ]
99 99 99
Avg. 99.000 (min 99 max 99 )
(Labo Data) FCP: 0.744 s, TBT: 0.000 s, SI : 0.744 s, LCP: 0.770 s, CLS: 0.000

============================================================

Finish!!
lh-score-collector の結果比較 Windows11 vs. WSL2 Ubuntu
結果を一覧表でまとめました。上が Mobile、下が Desktop の結果です。
| Page No. | 1 | 1 | 2 | 2 | 3 | 3 | 4 | 4 | 5 | 5 | 6 | 6 | Green Range |
| Arch. | Win | WSL | Win | WSL | Win | WSL | Win | WSL | Win | WSL | Win | WSL | - |
| Perfor- mance | 95.0 | 93.7 | 94.7 | 94.3 | 94.0 | 92.7 | 94.0 | 93.7 | 94.7 | 92.7 | 94.7 | 94.0 | 90-100 |
| FCP | 1.28 | 1.26 | 1.19 | 1.81 | 1.65 | 2.09 | 1.64 | 1.75 | 1.44 | 2.16 | 1.45 | 1.83 | 0 - 1.8 |
| TBT | 0.02 | 0.11 | 0.00 | 0.00 | 0.00 | 0.00 | 0.00 | 0.01 | 0.00 | 0.00 | 0.00 | 0.00 | 0 - 0.2 |
| SI | 1.28 | 1.26 | 1.19 | 1.81 | 1.65 | 2.09 | 1.64 | 1.75 | 1.44 | 2.16 | 1.45 | 1.83 | 0 - 3.4 |
| LCP | 2.86 | 2.82 | 2.95 | 2.88 | 2.99 | 2.97 | 2.97 | 2.97 | 2.97 | 2.98 | 2.96 | 2.87 | 0 - 2.5 |
| CLS | 0.00 | 0.00 | 0.00 | 0.00 | 0.00 | 0.00 | 0.00 | 0.00 | 0.00 | 0.00 | 0.00 | 0.00 | 0 - 0.1 |
| Page No. | 1 | 1 | 2 | 2 | 3 | 3 | 4 | 4 | 5 | 5 | 6 | 6 | Green Range |
| Arch. | Win | WSL | Win | WSL | Win | WSL | Win | WSL | Win | WSL | Win | WSL | - |
| Perfor- mance | 99.0 | 99.3 | 100 | 99.3 | 100 | 99.0 | 100 | 98.7 | 100 | 99.0 | 100 | 99.0 | 90-100 |
| FCP | 0.57 | 0.57 | 0.44 | 0.59 | 0.52 | 0.77 | 0.40 | 0.69 | 0.40 | 0.76 | 0.46 | 0.74 | 0 - 1.8 |
| TBT | 0.00 | 0.00 | 0.00 | 0.01 | 0.00 | 0.00 | 0.00 | 0.00 | 0.00 | 0.00 | 0.00 | 0.00 | 0 - 0.2 |
| SI | 0.57 | 0.57 | 0.44 | 0.59 | 0.52 | 0.77 | 0.40 | 0.69 | 0.40 | 0.76 | 0.46 | 0.74 | 0 - 3.4 |
| LCP | 0.93 | 0.81 | 0.67 | 0.84 | 0.69 | 0.78 | 0.73 | 0.84 | 0.69 | 0.76 | 0.76 | 0.77 | 0 - 2.5 |
| CLS | 0.00 | 0.00 | 0.00 | 0.00 | 0.00 | 0.00 | 0.00 | 0.00 | 0.00 | 0.00 | 0.00 | 0.00 | 0 - 0.1 |
Windows11 の結果に対して、WSL2 Ubuntu の結果は Performance で最大 2 ポイント下がっています。主な要因は FCP (First Contentful Paint) と SI (Speed Index) の悪化です。WSLg 環境で実行している影響と考えられます。
WSL2 は軽量とはいえ仮想マシンの実行環境ですし、WSLg も Windows ネイティブなソフトウェアと比較すればロスは少なからずあると思いますので、妥当な結果かと思います。
とはいえ、どちらの結果も Performance としては良好レベルでした。これを維持できるように、これからもページの最適化を進められたらと思います。
まとめ
PageSpeed Insights は Google のサーバーと WordPress を動作させているサーバーの間で測定する、理想的な条件の結果です。それに対して、手元の PC と WordPress を動作させているサーバーの間で現実的な結果を取得する為に、コマンドライン版 lighthouse を実行する環境を Windows11 と WSL2 Ubuntu に作ってみました。
また、複数回の複数サイトの結果を一度に測定できるように、過去に使用できるように手直しした PageSpeed Insights 用の Python スクリプト psi-score-collector を改良し、lh-score-collector を作成しました。
Windows11 版に対して、WSL2 Ubuntu 版 lighthouse の結果は Performance で最大 2 ポイント下がる結果でした。仮想マシンのレイヤーを挟んでいますので、下がるのは妥当な結果だと思います。
それでも、現実的な結果を取得する以外にも、インターネットに接続できない環境でサイトの速度を評価する場合にも活用できると思います。psi-score-collector と lh-score-collector の二つのスクリプトは 4月以降の QUIC.cloud CDN の評価に活用したいと思います。
今回のアイキャッチ画像
氷山を Stable Diffusion WebUI で生成してみました。海面の反射含め幻想的な風景が得られました。
PC 用のスピーカーには、Micca COVO-S を使用しています。Sabaj のアンプは Amazon では販売終了となっていましたが、Micca COVO-S は今も継続して入手できます。別途アンプは必要ですが、適度な大きさで置き場所に困らず、PC 用と考えれば十分な性能です。


購入した際のはてなブログの日記です。


コメント